My Portfolio Potentials

Please take a second to tell me your top 10 photos. You can click them to see them bigger.

Cabin in the Sun

Cash Register

50 cents

50 cents: 8-11-2010; 4pm; Fort Edmonton AB CA; f/5.6; 1/250; Nikon D80

Corn

Decisions

Harvest Time

Tombstone


Door Portrait

helping hands

honey moon lake

Honeymoon Lake

Honeymoon Lake: 8-12-2010; 6pm; Honeymoon lake Alberta Canada; f/9; 1/40; Nikon D80

Truck

Flower with water

Bee

Side walk

Puddle world

Cozy Cabin

Cozy Cabin

Cozy Cabin: 2-6-2010; 1am; BYUI Beaver Creek; f/11; 15″;Nikon D80

lighting

Golden Pond

Wheel

Wheel at Sunset

Wheel at Sunset: 5/28/2010; 8pm; North Logan, UT; f/10 & f/4; 1/80 & 1/400; Nikon D80

Face of Time

Ben

Kyle & Heather

Posted in Uncategorized | 2 Comments

Guu Potentials

Posted in Uncategorized | Leave a comment

Google Photography Prize Contest

   a. Add the normal photographic labels
   b. Include a paragraph or two about how you created your entry.
c. Add a paragraph about the contest you chose and why you chose it.
   d. Add a link to the contest website.
   e. Include the date you submitted your entry.

Here are my four entries to the Google Photography Prize Contest:

Harvest Night: 10-02-2011; 7:24pm; Benson, UT; f/5.6; 1/60; NIKON D80
Harvest Season: 09-26-2011; 7:06am; Near Sugar City, ID; f/5.6; 1/160; NIKON D80
Cabin in the Sun: 10-20-2011; 6:14pm; Bannack, MT; f/11; 1/200; NIKON D80
Puddle World: 10-10-2011; 8:29am; Rexburg, ID; f/3.8; 1/100; NIKON D80

All of these pictures are on my blog under the weeks that I shot them (or thereabouts). Even though I explain the major edits I did to these photos in those posts. I actually had to do a couple more things to some of these pics before sending them in. In Harvest Night i had to clean up some weird pixels. I then also reduced the noise and lightened it with levels. In Harvest Season I sharpened the subject and turned the type layer off. Cabin in the sun I brightened it with levels. I didn’t do anything more to this pic.

I chose these photos because they are some of my favorite shots from the semester. I would have loved to go out and shoot pictures for the contest but I just didn’t have time to do that. These pictures are some of my resent best, that don’t have models, and applied to the topic. They chose some cool topics, I just didn’t have any pictures that fit the other topics.

 
This contest is for any student enrolled in Collage or University. They had 10 different categories. I chose to do Sound/Silence. Their caption for this category was “What does sound look like? Can you show us in a photo?” I went with the silence side of things and chose my nice nature shots from this semester. It is interesting, to submit the photos you put them on your Google+ account with labels. Here is a link to the contest’s website. Google Photography Prize Contest The largest reason I entered this contest is because it was free. I also keep the copyrights to my photos and I am interested in getting more acquainted with Google+ as well. I entered the competition on 12-14-11.

Posted in Uncategorized | Leave a comment

My Poster Shots

Over this semester I have taken some shots that I like and have printed them up large. The one of the truck is 24×36 and the other two are 12×36.

International  Truck: 10-20-2011; 6:36pm; Bannack State Park, MT; f/10; 1/6; Manual; NIKON D80

To edit this photo I first ran it through Photomatix. I used the B&W setting but then played with the sliders to get this. The front tire has a spot that is ripped. when it was converted to B&W it turned solid white and was really distracting. I pulled a different exposture of the image and the Photomatix image in to Photoshop. I then masked the image in and lined up the tire spot. Then did a simple B&W adjustment layer to make it match the rest of the image.

HDR Pano of Bannack: 10-20-2011; 5:40pm; Bannack State Park, MT; f/14; 1/80; Aperture Priority & Auto Bracketing NIKON D80

For this shot I shot a total of about 30 images. It is a true HDR with 3 photos for each of the 10 shots. I first brought each set of exposures into Photoshop and stitched each pano. I was left with three jpgs one fore each exposure. They were too big for Photomatix so i half sized them first and it worked. Once i got the HDR how I liked it, in Photoshop I took off some dust on my lens.

Bee Flower Original: 10-02-2011; 6:03pm; Logan, UT; f/10; 1/80; Auto; NIKON D80

For this shot the sun was lighting the flower very nicely. I took a lot of angles to make sure that I got something in focus. My camera some times has trouble with close shots. In Photoshop I make a layer with solid rectangles and made it a clipping mask for the image. I took out different blemishes in the flower, as well as some sharping on the bee and flower. I also lightened the bee. The peddles of the flower lost some of their nice ripples, So I believe I copied the layer and used a blending mode to darken only the lines. I edited this picture multiple times and so I don’t remember exactly.

The reason I the truck photo was because I loved the way it turned out. I have never had such a cool B&W picture before. I feel it is some my best work. for the HDR pano I loved how the colors popped, and wanted to see it big. Because I was going to print the HDR big it didn’t cost any more to print another photo next to it on the same go. My wife really liked the flower shot, she likes sunflowers. Really the two long shots were decided in a pair, because I had two that I liked I went a head and printed them up too.

Posted in Uncategorized | Leave a comment

CINEMAGRAPHS

I made these cinemagraphs using a HD video camera and Photoshop. Most people use their DSLR, mine does not shoot videos. Here is a link to a site that has some awesome ones.  I hope to do better ones when i have more time to explore this cool photo technique.   Here is a link to a tut.

Here are mine I shot today:

Posted in Uncategorized | 1 Comment

Art Templat

Tetons in the Morning Original: 10-03-2011; 7:27am; Rexburg, ID; f/22; 1/13; NIKON D80

Bee Flower Original: 10-02-2011; 6:03pm; Logan, UT; f/10; 1/80; NIKON D80


Posted in Uncategorized | 1 Comment

Night Shots

Color Ribbon: 11-06-2011; 8:59pm; Rexburg, Id; f/11; 25.0; NIKON D80

I used my phone with a flash light app that blinks the different rainbow colors. I could set the speed that it changed. All I did was move the phone around.

Light Blur: 11-06-2011; 10:07pm; Rexburg, ID; f/9; 6.0; NIKON D80

I put my camera on my tripod. Then I set two of the legs on my porch and held the tripod so that the camera was in between  the head lights. Then I had a rear flash to pop the car an ground in.

Beam Me Up: 11-07-2011; 12:17am; Rexburg, ID; f/16; 3.0; NIKON D80

Used my tripod. framed the light where the sidewalk would endup and then moved the  camera to the final place and let it stay there for a bit longer so the building showed up.


Teleportation Inseption: 11-07-2011; 12:21am; Rexburg, ID; f/16; 5.0; NIKON D80

I did the same thing as above but stopped tree times. The other key thing is to find a light that is really blinking, but you can’t see it. Colorful Ants: 11-07-2011; 12:24am; Rexburg, ID; f/16; 2.5; NIKON D80

Pointed the camera at some lights and moved the camera. Then i rotated it to be vertical.

Lit Patrol: 11-07-2011; 12:29am; Rexburg, ID; f/6.3; 15.0; NIKON D80

I took the three shots below. Then took the parts i liked from each, to get the cool lighting and to get rid of my faces. I used masks.


Light Painting 1: 11-07-2011; 12:29am; Rexburg, ID; f/6.3; 15.0; NIKON D80
Light Painting 2: 11-07-2011; 12:29am; Rexburg, ID; f/6.3; 15.0; NIKON D80
Light Painting 3: 11-07-2011; 12:31am; Rexburg, ID; f/6.3; 15.0; NIKON D80

Posted in Uncategorized | 1 Comment

Scanography

Space Currency: 10-31-11; 10:30am; My House; Photoshop

The originals: All were scanned at 1200 dpi, I blured the dollar one to not get in trouble.

To do this I made concentric circles on individual layers. Then I Lowered the fill opasity to 0% and added a small stroke to each layer. Then I merged them to one layer. Then I made a 3d postcard out of the layer. This way I could rotate the rings to get the perspective of the orbits. I then used the 3D rotate tool and the 3D sacle and 3D pan tools to get what I wanted. The problem was that it was then to low res. I then used the pen tool to trace the rings each with their own path and then stroked each path with small brush to make them smooth. I did the strokes on a new layer and dropped the opacity for it.

For the planets I  extracted them from each scan and rotated them to be strait. For Ben I made it more round and cloned out his name at the bottom using the top, this also gave it a ring all the way around him. Then i added a sats layer and colorized it. For the shadows on each planet, I shift+control clicked each planet layer and filled the selection with black on a new blank layer. I then drew a oval section and moved it around and deleted the black to make them look like spheres. I blured the shadows and changed the blending to soft light, doubled the layer and dropped the opacity, to get it the correct density.

For the background I used this tut from Cory Barker, http://www.planetphotoshop.com/space-background.html. On the last step I changed the blending mode of the last layer to Linear burn. I think it turned out cool!

Posted in Uncategorized | 4 Comments

Top Other Pictures at Bannack

Don’t Touch Me: 10-20-2011; 5:32pm; Bannack State Park, MT; f/5.6; 1/400; NIKON D80


There was nothing behind this little plant because it was on a cliffs and so I tried to get some really good bokeh. It turned out great.

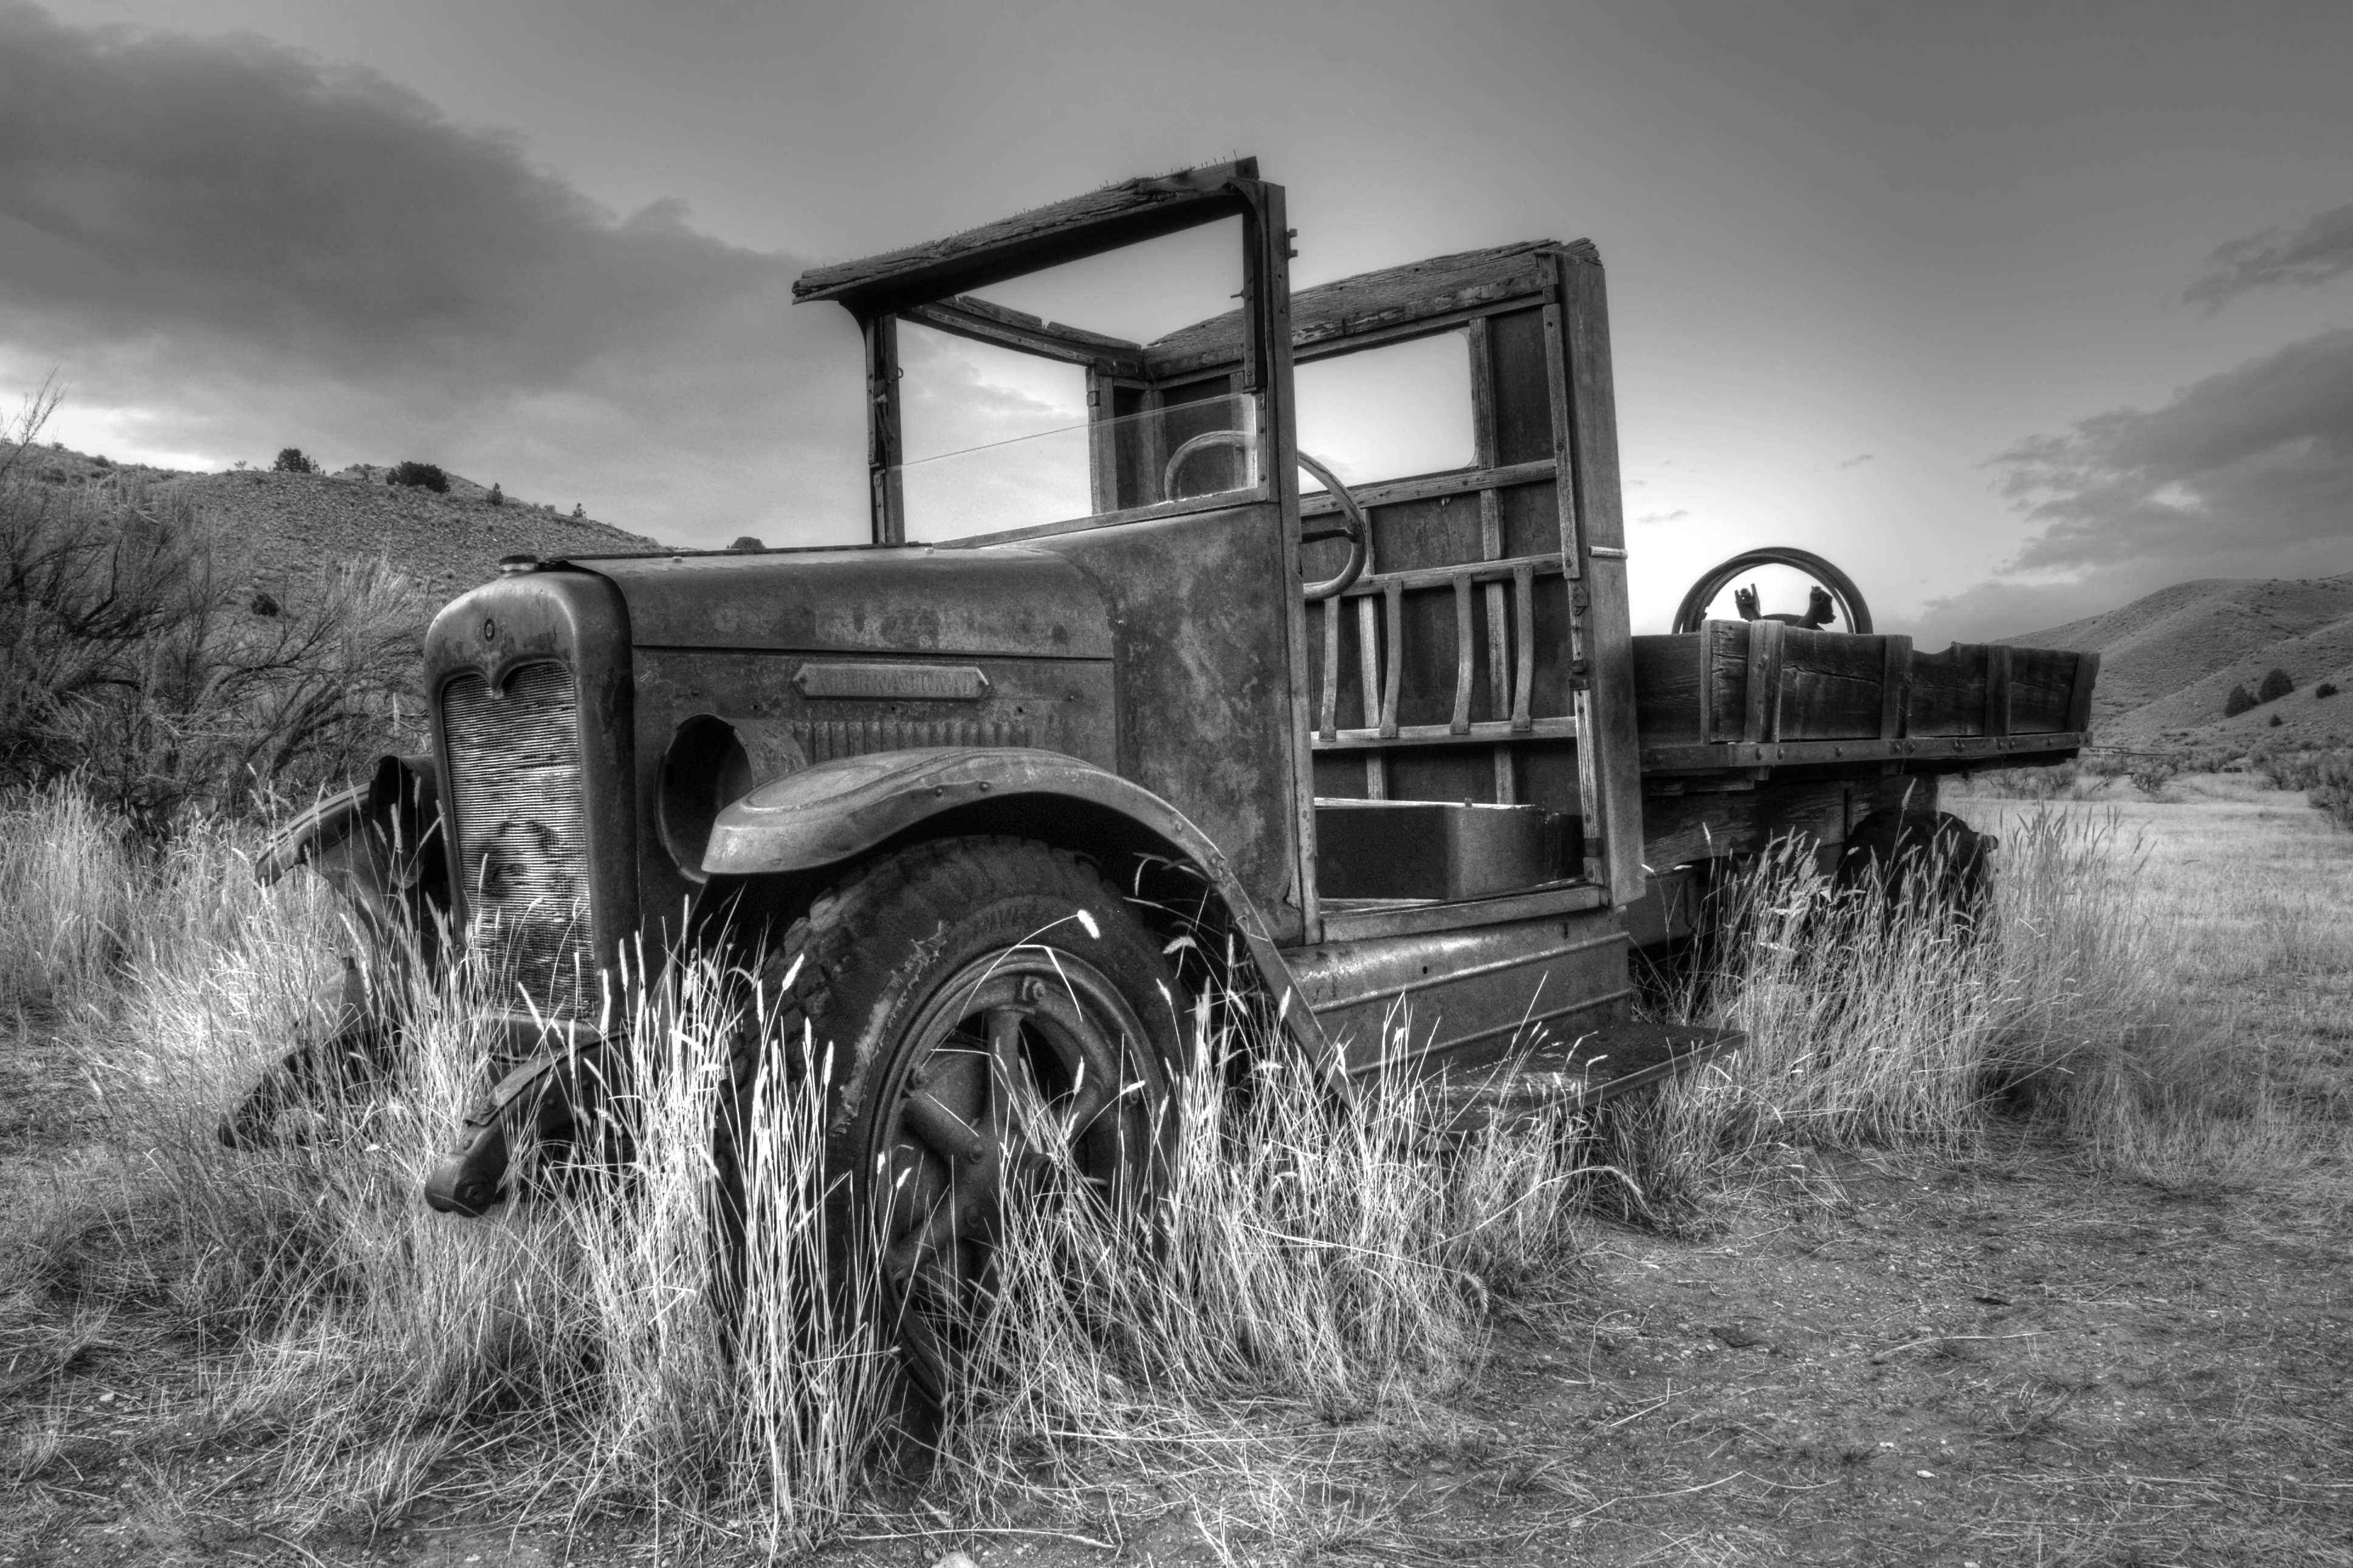
Barrel: 10-20-2011; 4:44pm; Bannack State Park, MT; f/7.1; 1/640; NIKON D80

I don’t know if I should do two barrel pictures, but this one is great too. I like the color and the symmetry. I added the vignette and the tried to lighten the shadow at the bottom right in raw. I had to lie down to get the shot.

Compass and Square: 10-20-2011; 2:34pm; Bannack State Park, MT; f/5.6; 1/60; NIKON D80

This shot was brought to you by my Sigma flash. This is a picture of the Holy Bible in the Masonic Lodge. It was really dark in side and so I popped my flash on and was trying/going to point it right at the subject but then remembered to try and bounce it off the ceiling. So I didn’t and it lit it well. In post I brightened and sharpened it, and added vibrancy and the vignette all in RAW. I like how It turned the plastic does not look that bad but I wonder how/ if I could reduce it to make the text on the Bible more readable.

1 Chuck, 2 Chuck: 10-20-2011; 0:34pm; Bannack State Park, MT; f/5.6; 1/8; NIKON D80

I saw a cool pic a while back that had Chuck Taylors in them and sense then have wanted to get one of my own. I saw the chance and took it. The picture that is. lol. In jgp-raw I used a brush with lower exposure to bring back the blown out floor.

Plug: 10-20-2011; 4:43pm; Bannack State Park, MT; f/7.1; 1/800; NIKON D80

For this I’m pretty sure all I did was add a vignette using Cam-RAW.

Cabin in the Sun: 10-20-2011; 6:14pm; Bannack State Park, MT; f/11; 1/200; NIKON D80

When I saw this moment, I really wanted to shoot it, but the high contrast from the sky to the dark cabin was huge. Plus come to find out I had left my camera in bracketing mode and so I couldn’t make the picture work when I made a change it would also make a change. So in Post when I saw the pics – wanted to see just how good Cam-RAW is, and I took the challenge. I used two photos, one where you could see the cabin and fence a bit and one where the sky looked good. I edited the NEF of cabin one in RAW to get it look the best I could. Then brought in the sky from a jpg I think. I then masked the cabin out of the sky pic. The sky was not blue enough so I used a solid color adjustment layer and copied the mask from the sky to that layer and inverted the mask and then used gray on the mask to tone down the clouds. I also used levels to brighten it all, and some vibrancy to pop the colors. I think that there were some other steps, because I had a couple flattened layers in there, and I know me when back and tried to change something but I did not get it the way I wanted and left it. 🙂 I think it turned out awesome! Really this is evidence that you can save almost anything.


Posted in Uncategorized | Leave a comment

Light Painting

Light Painting: 10-20-2011; 7:27pm; Bannack State Park, MT; f/9; 43.0; NIKON D80


I had to play with the nefs and adjust the temperature to make it have the right color. Then I added clarity and sharpening in RAW as well.

Light Painting 2: 10-20-2011; 7:34pm; Bannack State Park, MT; f/10; 32.0; NIKON D80


This one was really dark and really should have been open longer but, I liked how the chair looked. I ended up brightening it in raw, with a couple sliders on a brush, as not to affect the hat. I think that I will come back and fix the grain in the black.


Posted in Uncategorized | Leave a comment